Setup Configuration:
Here you find all the information on how to setup the core functionalities of Ruby.Everything is already configured with default settings that should work for most common configurations, but if you need to change something or understand how something works, read the following sections:
Setup Telemetry:
Ruby can get the telemetry data from the flight controller and show it on the controller screen and can also output the telemetry data stream to auxiliary devices like a PC or laptop in order to be able to display the telemetry data on a PC and/or send commands and control the drone/plane/vehicle from the PC.
To do so, there are two set of connections to be made, as in the pictures below:
One is between the vehicle flight controller and the Pi on the vehicle, for Ruby to be able to access the telemetry data;
The second one, optional, is between the Pi inside the controller and the auxiliary external device, in order for the telemetry stream to be transported from the controller to a PC/laptop:
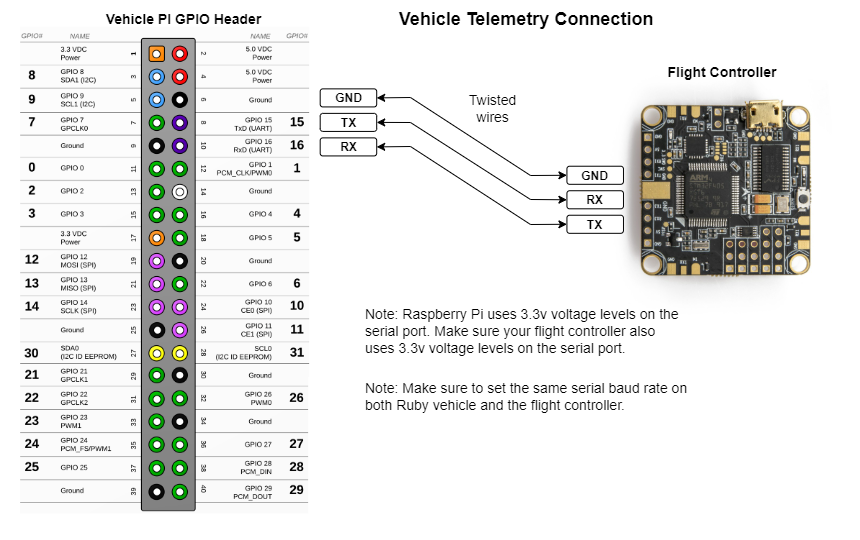
Telemetry connections on vehicles
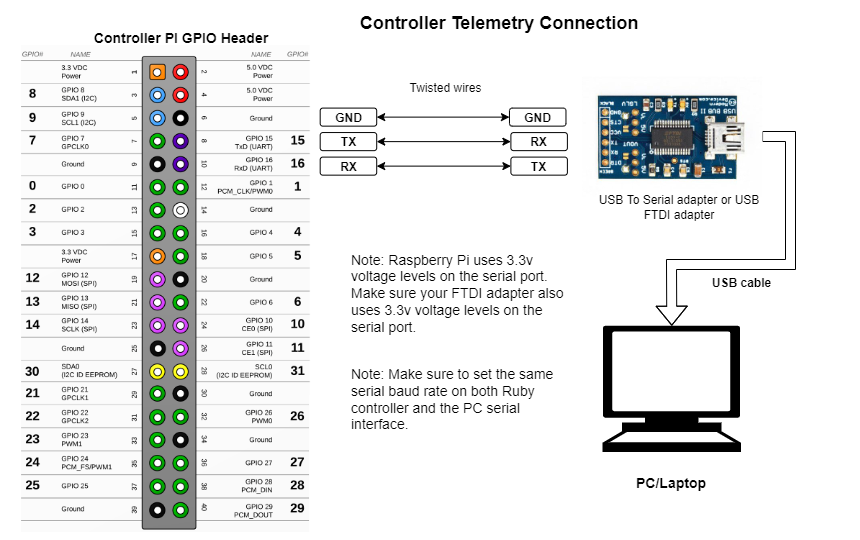
Telemetry connections on the controller
Note: Use only brand name USB to serial adapters or ones with CP2109 or CP2102 chipsets. The USB serial adapters with CH340 chipset are not supported.
Note: The CP2102 chipsets are the most reliable ones and work in all conditions. The CP2109 might be incompatible with some Pi boards, depending on the manufacturer.
For convenience, it's recommended you embed the USB serial adapter directly into Ruby controller. That way, if you need to connect your Ruby controller to a PC/laptop, you just have to use a regular USB cable and you have plug and play telemetry to your PC/laptop.
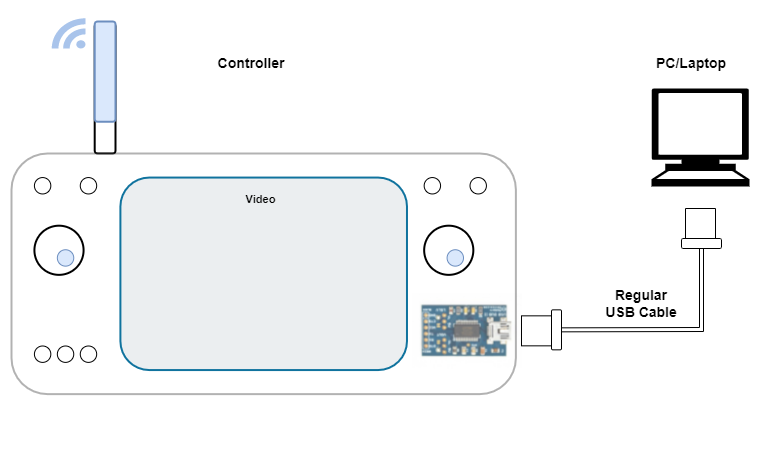
Recommended telemetry configuration. A regular USB cable will be used to connect to a PC.
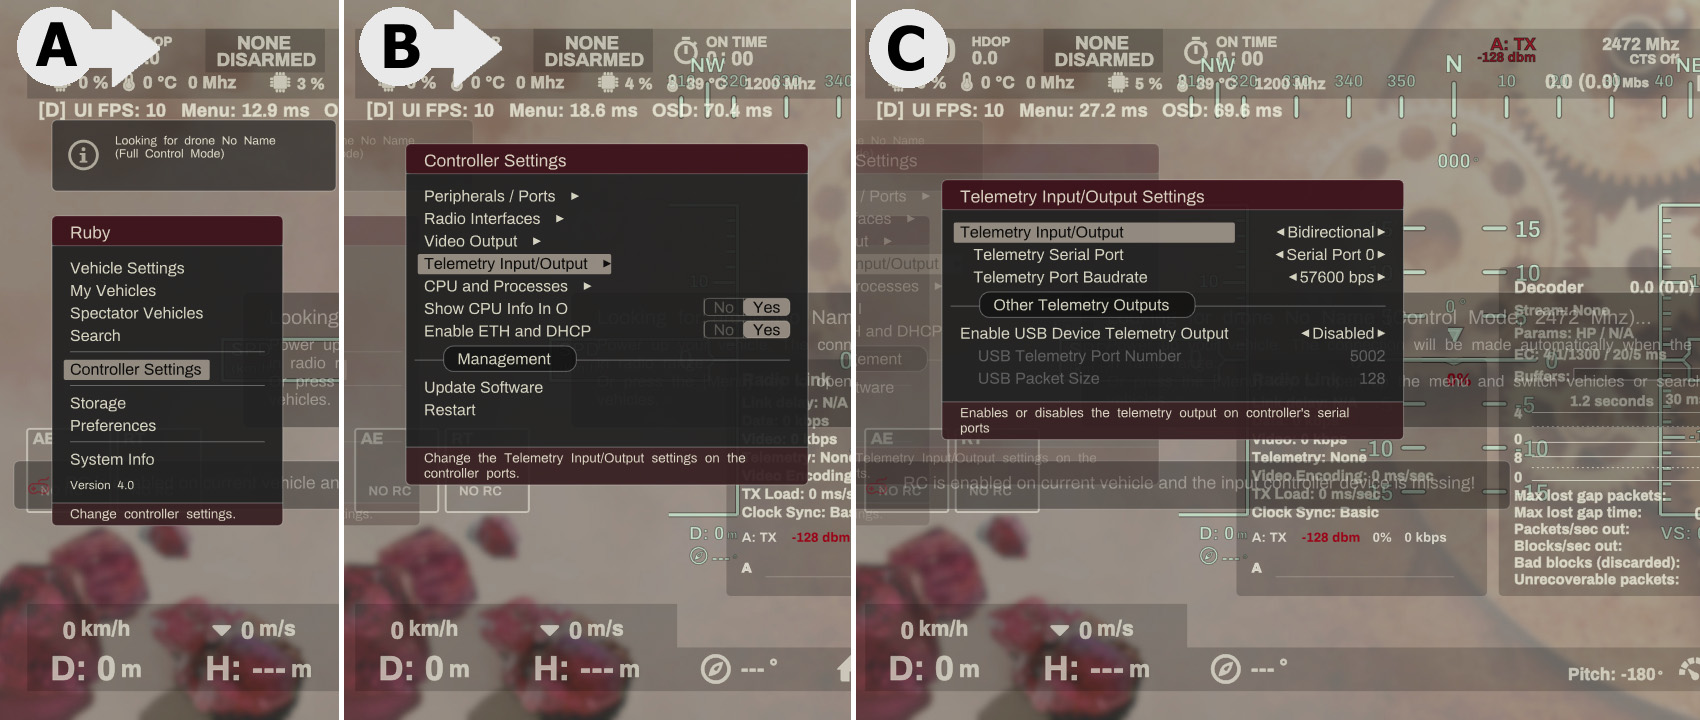
There are two places where you need to configure the telemetry parameters: One is on the vehicle side so that the vehicle knows how to communicate with the flight controller:

Click image to zoom
Read Only telemetry:
If you have other primary devices connected to the flight controller telemetry data and you wish Ruby to be just a secondary reader or telemetry data, you can set Ruby to be a read only participant, that is Ruby vehicle will not send any telemetry data to the flight controller. To do so, change Telemetry Options to ReadOnly and set Request Data Streams to None.
The other place where you can configure the telemetry parameters is on the controller itself, if you need to export the telemetry data to other devices or if you need to import telemetry data from other sources in order to send it to the vehicle. Otherways, you don't need to change anything on the controller side:
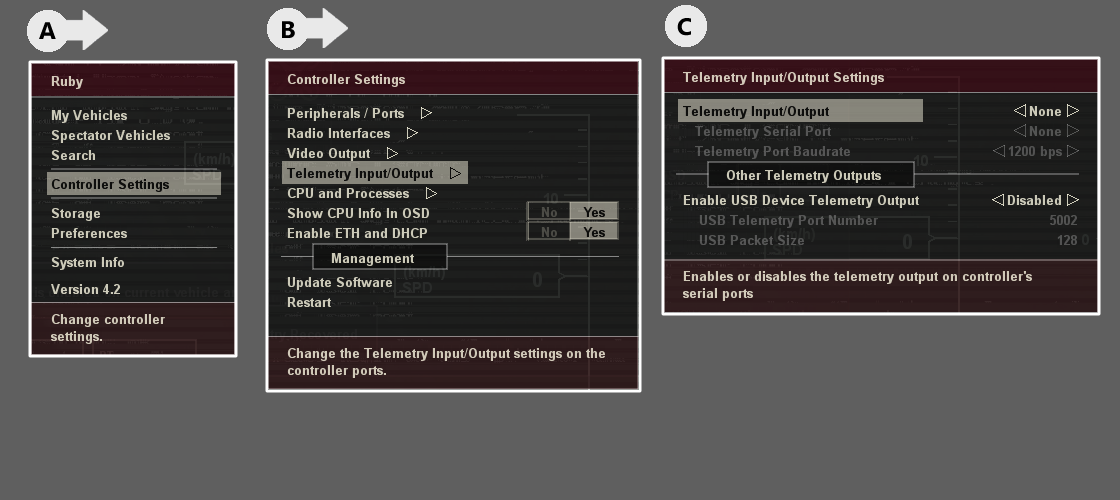
Click image to zoom
Setup Remote Control Link:
Ruby supports controlling your drone/plane/vehicle using the Ruby radio link.
To enable and use remote control functionality, you need to connect a joystick, gamepad, DIY joystick or a regular RC transmitter to your Ruby controller using a regular USB cable or using the IBUS/SBUS protocol.
See the Hardware Peripherals on how to make the connections for your input device.
Calibration:
If you are using IBUS/SBUS input protocol from a RC transmitter, then just skip this calibration step. It's not needed and not present in the menus, as all the calibration and channels settings are done on your RC transmitter itself.
On the Ruby controller, calibrate your joystick/gamepad:
Go to
Menu->Controller->Peripherals and there you will your joystick and options to calibrate the joystick and set the center dead zone (for the gimbals/joystick):
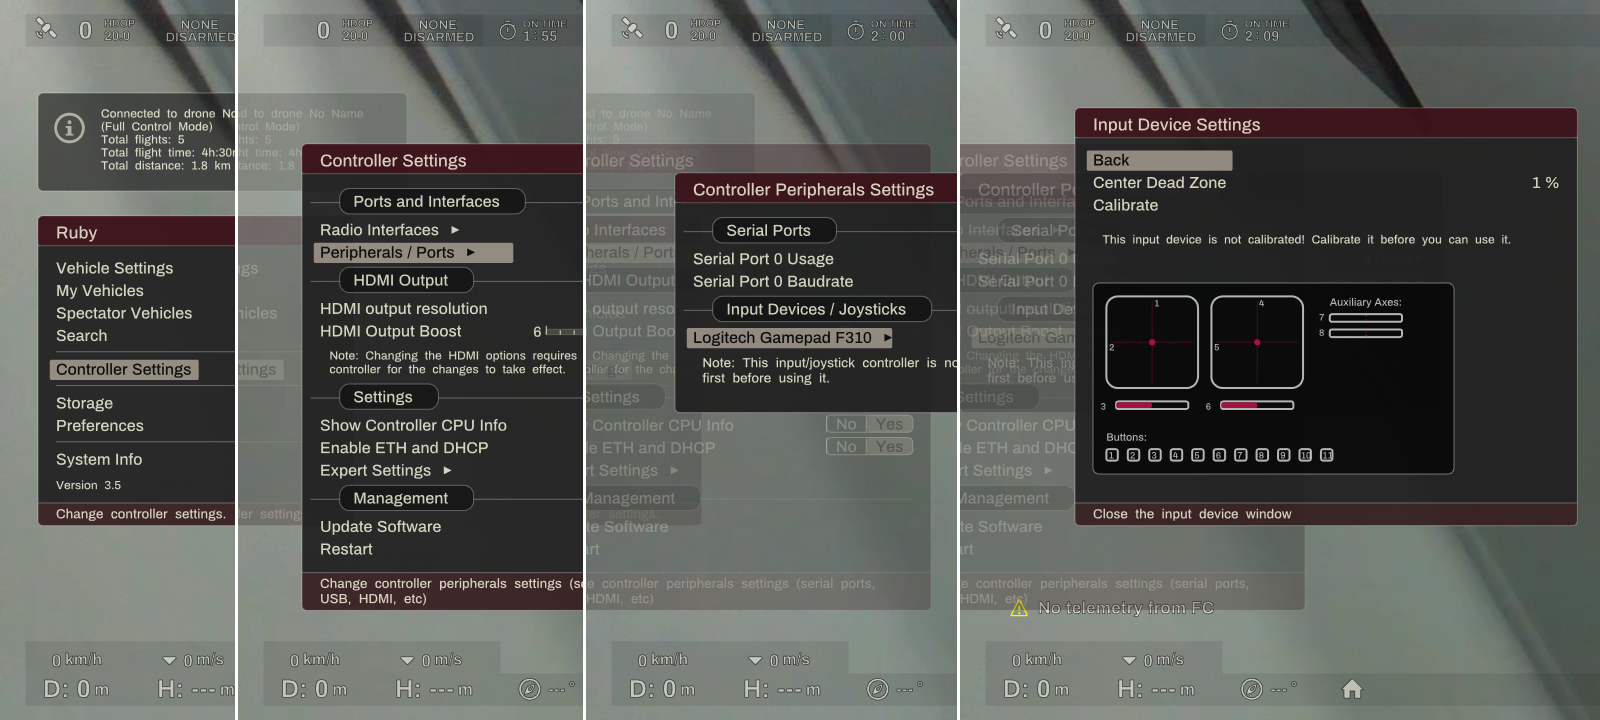
Joystick calibration (needed only for USB joysticks, not for IBUS/SBUS input)
Note: You do need to do the calibration for your joystick before you can properly enable and use the RC link.
After you connected your joystick and did the calibration, or, if using IBUS/SBUS protocol, after you connected your transmitter to Ruby using the schematics from Hardware Peripherals, you can now configure and enable the RC link:
RC Link Settings:
You need to configure your RC link and channels to control the vehicle as needed:
Go to
Menu->Vehicle->Remote Controll and there you'll have options to:
* Enable the RC Link;
* Choose what input device you have: a USB joystick or a IBUS/SBUS device;
&nbps;&nbps; If you use a IBUS/SBUS device with the additional Raspberry Pi Pico attached to the Ruby controller, you can set the protocol (SBUS or IBUS) and if it should be inverted or not from
Menu->Controller->Peripherals->I2C Devices->RC In
* Set the RC frames frequency;
* Set the failsafe type and values;
If using a USB joystick, you need to assign joystick inputs to each RC channel. Basically you tell Ruby what RC channel is controlled by what stick or button on the joystick:

Configuring RC Channels (needed only for USB joysticks, not for IBUS/SBUS input)
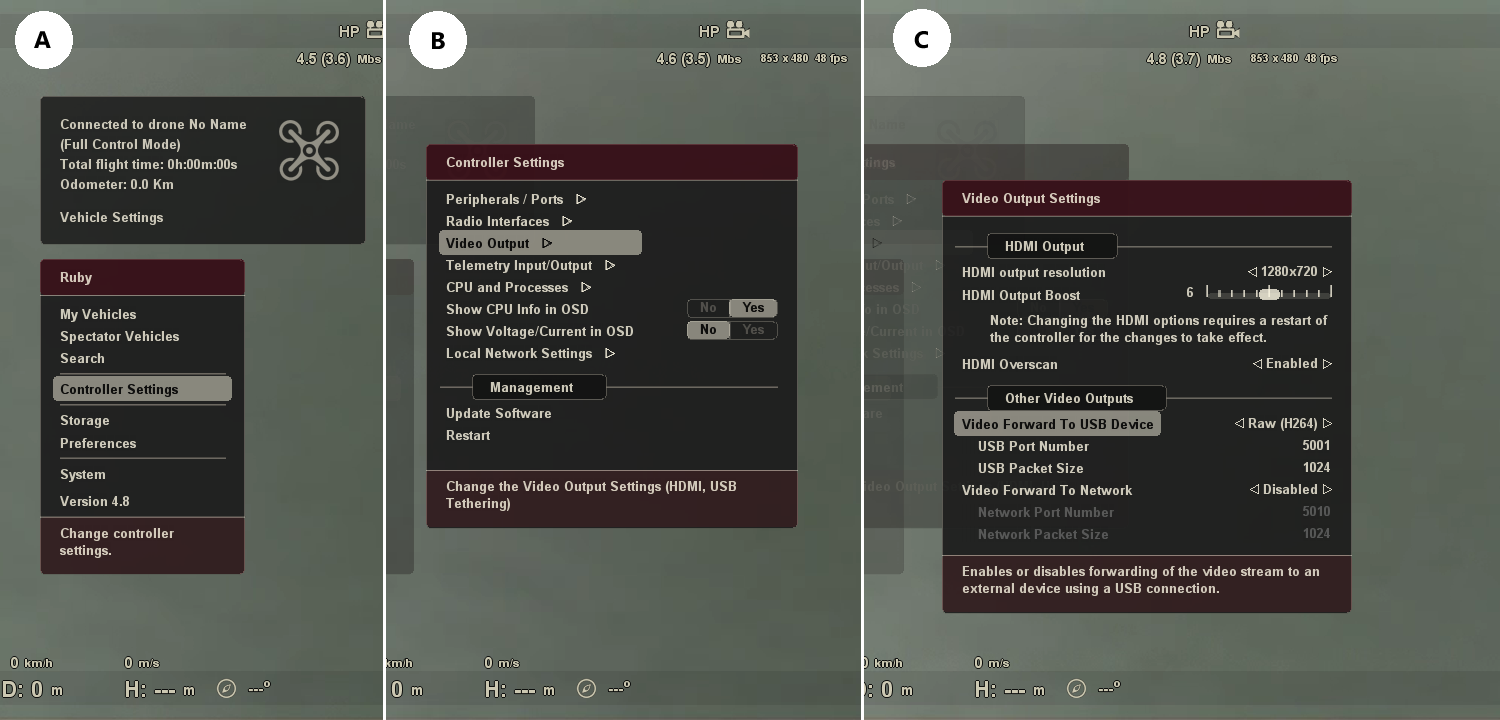
Setup Phones/Tablets/PCs:
By default Ruby controller outputs the live video stream from the vehicle to it's HDMI output port.
You can use smartphones,tablets or a PC as a secondary display for the live video stream and for telemetry.
There are two options to connect external devices to Ruby controller:
USB Tethering
This option should be used to connect to a phone or tablet.
The setup is as follows:
- Using a regular USB cable, connect your phone/tablet to a USB port on the Ruby controller;
- On your phone/tablet install a FPV VR app (any) from Google Play Store. Like this one: FPV VR On Google Play Store;
- Then, on the controller menu, just enable forwarding the video stream to the USB tethering connection so that the phone becomes a secondary display:
How to enable USB tethering and video output to phone
Most FPV/VR apps on the phones do support displaying also the telemetry information, not just video. To get also telemetry on the phone apps, make sure you enable the telemetry output too on the controller:
How to enable telemetry output on the USB tethering connection
Here is an example on how to start video on your phone:
- In Android app FPV VR: settings -> video settings -> raw 264 and port 5001;
- In android app FPV VR : settings -> set protocol to mavlink (if using mavlink oviously) and set the port 5002;
- In ruby controller settings: enable usb telemetry port 5002 (default);
- In ruby controller settings : enable video output usb and set port 5001(default);
- Phone/tablet in thetering mode (settings -> wireless&networks -> more -> usb Tethering);
- Launch phone app FPV VR (with all settings as in point 1);
- Click on Connect (V/T settings) and there is a menu in the top left corner (opposite to settings menu) -> set to EZ-Wifibroadcast/OpenHD and go back;
- Click on start video
PC connection using the local network
This option should be used to connect to a PC.
The setup is as follows:
- Connect your Ruby controller to the same network as your PC using your router and an ethernet cable. You can also use a direct ethernet cable between Ruby controller and the PC, in which case you need to enable the Static IP option in the controller from
Menu->Controller->Network - On your PC install GStreamer and Mission Planner or QGroundControll;
- Then, on the controller menu, just enable video forwarding to the local network so that you can consume the video stream on your PC:

How to enable video forward to local network
Now the video stream is available to be consumed on a PC. To display the video stream on the PC, first export it as Raw (H264) from the menu above and use GStreamer on the PC to read the video stream and convert it to a format that Mission Planner understand.
To do that, install GStreamer on your PC and then from a command prompt launch this command:
gst-launch-1.0.exe udpsrc port=5010 ! h264parse ! rtph264pay ! udpsink host=127.0.0.1 port=5600
Replace port 5010 in the command above with the port number you configured in the controller menu above, if you changed the default 5010;
Basically this will transform the video stream to a format Mission Planner understands and will be available for consumption by Mission Planner on port 5600.
In Mission planner, right Click on the HUD and then choose the "Set GStreamer Source" option:
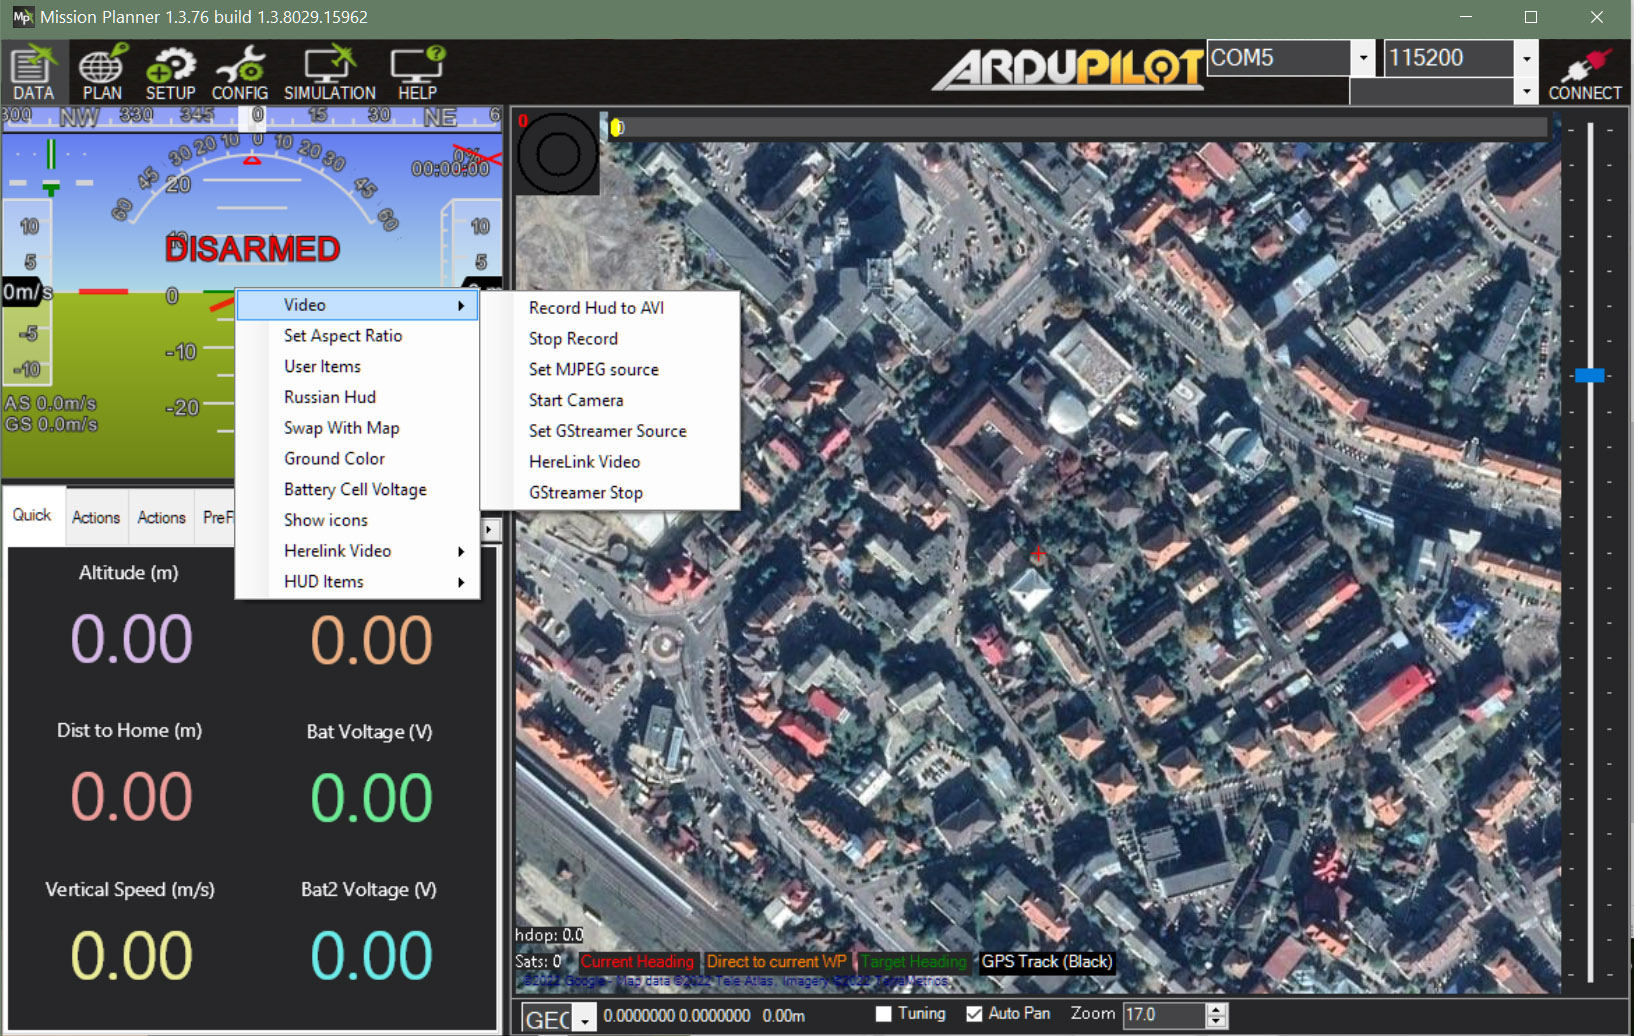
How to display video stream on Mission Planner
In the popup windows that shows up, enter this params:
rtspsrc location=rtsp://127.0.0.1:5600 ! videoconvert ! video/x-raw,format=BGRA ! appsink name=outsink
You might need to replace the 127.0.0.1 IP with your PC IP if it does not work.
That's all, you should have now video stream showing up in the Mission Planner HUD display.