Tutorial on how to write an OSD plugin
A tutorial by Alexey Belyaev.
A short instruction on how to assemble plugins, using the example of OSD Plugin for RubyFPV
Ideally, it is better
to use Linux or Darvin for assembly, but it also builds perfectly on Windows.
For assembly we need:
1. Source code RubyFPV (https://github.com/PetruSoroaga/RubyFPV)
2. Source code of OSD Plugin (https://github.com/.../code/r_plugins_osd/my_plugin_source.cpp)
3. Make tool packet for build control (for Windows: https://gnuwin32.sourceforge.net/packages/make.htm)
4. GCC for ARM AArch32 target with hard float arm-none-linux-gnueabihf (for Widows: https://developer.arm.com/downloads/-/gnu-a)
5. Developer IDE VSCode (https://code.visualstudio.com/download)
That seems to be all.
Note: I've heard a
lot of opinions and seen a lot of instructions where the authors claim that a
�special� compiler is needed to build for Raspberry, but in practice everything
is much simpler. Suitable universal for ARM.
I will not tell you
how to install the packages described above, this is not what this instruction
is about. They are assumed to be installed.
The minimum set of
source code consists of 2 files of the plugin itself and the RubyFPV source code:
RubyFPV
code\
licenses\
mavlink\
res\
...
Plugin\
Makefile
my_plugin_source.cpp
The file
my_plugin_source.cpp contains the code of the plugin itself, in this case it is
completely the same code from the �RubyFPV source
package�
But the Makefile file requires special attention, its contents are the following:
VER_MAJOR := 1
VERSION := $(VER_MAJOR).0.1
PREFIX := arm-linux-gnueabihf-
GPP := $(PREFIX)g++
GCC := $(PREFIX)gcc
PLATFORM = -march=armv7-a -mfloat-abi=hard -mfpu=neon-vfpv4
INCLUDES += -I../../RubyFPV/code
LDFLAGS= -lrt -lpthread -lc -shared $(LIBS)
CFLAGS += $(PLATFORM) -fno-stack-protector -Wall -O0 -D _GNU_SOURCE
-Wno-address-of-packed-member $(INCLUDES)
CPPFLAGS= $(PLATFORM) $(CFLAGS) --std=gnu++17
OUTPUT := build
.PHONY: clean all
all: my_plugin
$(OUTPUT)/%.o: %.cpp mk-dirs
$(GPP) $(CPPFLAGS) -c -o $@ $<
my_plugin: $(OUTPUT)/my_plugin_source.o mk-dirs
$(GCC) $(CFLAGS) $(LDFLAGS) $(OUTPUT)/my_plugin_source.o -Wl,-soname, my_plugin.so.$(VER_MAJOR) -o $(OUTPUT)/my_plugin.so.$(VERSION)
mk-dirs:
mkdir ./$(OUTPUT)
clean:
rm -fr $(OUTPUT)
Note: I do not
pretend that the example has the only one correct solution.
Let's take a closer
look at the important points:
1.
VER_MAJOR
and VERSION variables for easy maintenance of the plugin version
2.
PREFIX it
is necessary to set the �prefix� of the GCC executable files for assembly for
the ARM platform, for the case of Raspberry Pi this is AArch32 with hard float
3.
PLATFORM compiler
switches, specifying the hard float option and the architecture of a specific
processor.
The above keys will
allow you to collect the �correct� binary code from any system.
1.
-Wno-address-of-packed-member key required to hide warnings
when building mavlink
(https://mavlink.io/en/mavgen_c/#waddress-of-packed-member) in case your plugin
will use its functionality.
The plugin is built
normally using the make all commands, there are no special features here.
Now a little about the ease of development. VSCode
and several plugins will help us with this.
In my opinion the minimum set is:
1. C/C++ (https://marketplace.visualstudio.com/items?itemName=ms-vscode.cpptools)
2. C/C++ Extension Pack (https://marketplace.visualstudio.com/items?itemName=ms-vscode.cpptools-extension-pack)
3. Makefile Tools (https://marketplace.visualstudio.com/items?itemName=ms-vscode.makefile-tools)
4.
Better C++ Syntax (https://marketplace.visualstudio.com/items?itemName=jeff-hykin.better-cpp-syntax)
Also in the project
you need to create a file .vscode/c_cpp_properties.json with the following contents:
{
"configurations": [
{
"name": "Raspberry",
"includePath": [
"${workspaceRoot}/**",
"${workspaceRoot}/../RubyFPV/code"
],
"defines": [
"_GNU_SOURCE"
],
"compilerPath": "arm-linux-gnueabihf-g++.exe",
"cppStandard": "gnu++17",
"intelliSenseMode": "linux-gcc-arm",
"configurationProvider": "ms-vscode.makefile-tools",
"cStandard": "gnu17",
"mergeConfigurations": false,
"browse": {
"path": [
"${workspaceRoot}/**",
"${workspaceRoot}/../RubyFPV/code"
],
"limitSymbolsToIncludedHeaders": true
}
}
],
"version": 4
}
The result should look
something like this:
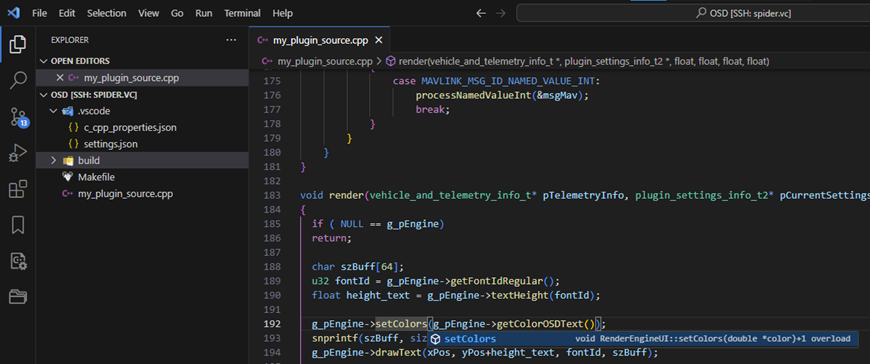
You can see that code addition works and you can move on to methods from
the main RubyFPV code