OSD Plugins SDK
You can write your own OSD/Instruments plugins in order to have different OSD elements, instruments or gauges displayed on the OSD.
The plugins you write can be distributed to anyone and they can install them directly from a USB stick.
To develop an OSD/Instruments plugin, you need to follow these simple steps:
1. Download the public code and SDK
Download or clone the Ruby codebase.
The files you'll need for writing a plugin are in this folder: here;
These are just some header files in C/C++ that define all the data structures you will need for your plugin.
2. Write a C/C++ library for the plugin
The plugins are just simple linux shared libraries. They just contain a predefined list of functions that needs to be exported as C functions and then Ruby can use them.
Mandatory functions:
The minimum list of functions (4 functions) your plugin needs to export in order to work correctly in Ruby, is this:
void init(void* pEngine);
This function is called first and you receive a pointer to the graphics engine. You should store this and use it in therenderfunction to draw on screen. See the SDK header files for the list of graphics functions you can use.char* getName();
This should just return a string that is the name you wish to apear in the user interface and menus.char* getUID();
This should return a unique string that differs from any other plugin. Just use random big number/string, like"75432-324-SFJKET-2342".void render(vehicle_and_telemetry_info_t* pTelemetryInfo, plugin_settings_info_t* pCurrentSettings, float xPos, float yPos, float fWidth, float fHeight);
This method will be called by Ruby to actually render your plugin on the screen. You'll receive as parameters all the info you need, like telemetry info, link info and so on (see the SDK header files for a full list of parameters you get). Keep in mind that this data is read only and gets destroyed after the call finishes. You receive updated values on the next call. If you need to save any values, you need to save them to your own variables. Your plugin should draw only in the allocated rectagle on the screen, as is defined in the parameters you get in this call. All screen coordonates in Ruby are real numbers between 0 and 1, the upper left corner of the screen is (0,0) and the bottom right corner of the screen is (1,1).
3. Compile your plugin
Assuming you wrote your 4 functions in a cpp file, let's call it
my_plugin_source.cpp, now you can compile your plugin. To do so, use a make file, create one called Makefile and add this content to it:
LDFLAGS=-lrt -lpcap -lpthread

CPPFLAGS=-Wall -O0 -D _GNU_SOURCE

CFLAGS := $(CFLAGS)


all: my_plugin


%.o: %.cpp

	g++ $(CFLAGS) -c -o $@ $< $(CPPFLAGS)


my_plugin: my_plugin_source.o

	gcc my_plugin_source.o -shared -Wl,-soname,my_plugin.so.1 -o my_plugin.so.1.0.1 -lc

clean:

	rm -f my_plugin.so.* *.o
Ofcourse, you should use whatever filename you need for the source file and a different name for the plugin library.
Now, assuming you have all the files (SDK header files, my_plugin.cpp and Makefile) in a folder, just type
make all and you should obtain a file named my_plugin.so.1.0.1
That is your final plugin and is what you can distribute to be installed and used by anyone.
Note: If you need additional icons or images for your plugin, you need to distribute those too (Ruby knows how to install those too automatically);
Note 2: You should compile your plugin on a Raspberry Pi. It might work also on a regular Unix machine, but have not tried it.
4. Install the plugin
This is the last step and is one that can be done by anyone that has your plugin, so that they can use it.
A. Copy your plugin (and any images you might need, if any) to a USB memory stick and plug it into any USB port on the Ruby controller;
B. On Ruby controller, go to
Menu→Controller Settings→Manage Plugins
C. Use the option to install additional OSD plugins. Ruby will search the memory stick and install the plugin (along with any images it finds);
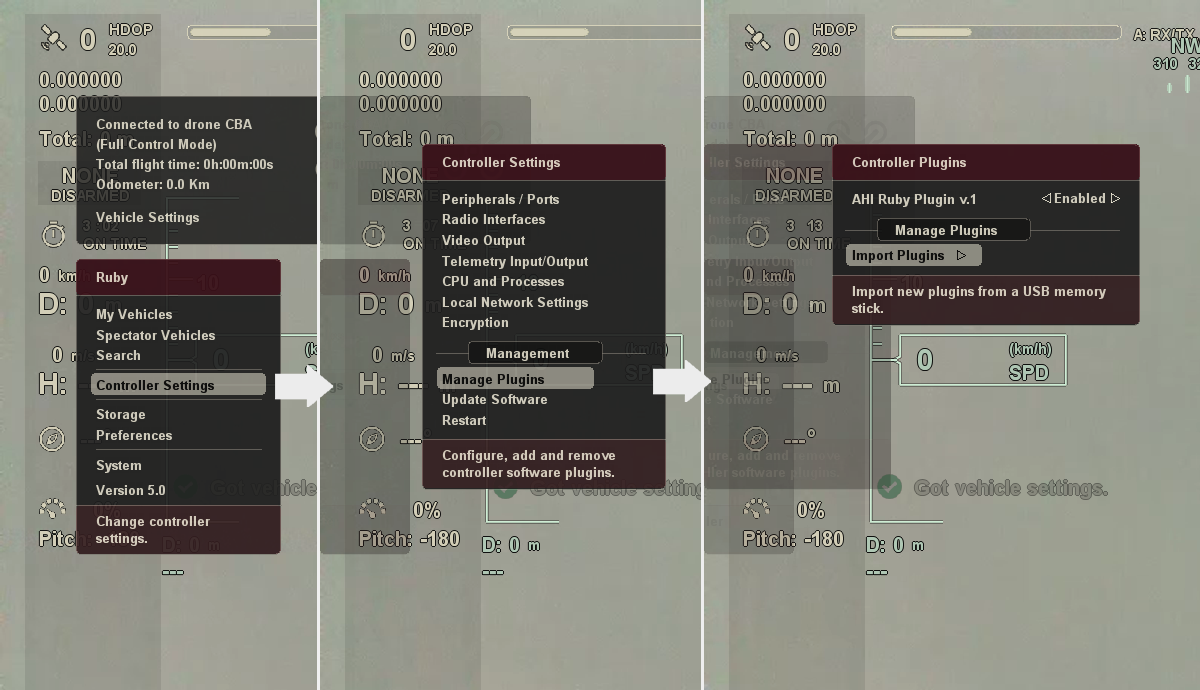
How to import plugins in Ruby
That's all, you can now remove the memory stick. Your plugin should show up now on the OSD and in menus and you can configure it (move it arround, resize it) and add it to the OSD layouts you want.
Example:
Here is an example plugin, it will draw a circle and show the vehicle heading centered on the plugin viewport.
#include <stdio.h>

#include <math.h>

#include "render_engine_ui.h"

#include "telemetry_info.h"

#include "settings_info.h"


PLUGIN_VAR RenderEngineUI* g_pEngine = NULL;

PLUGIN_VAR const char* g_szPluginName = "My Example Plugin";

PLUGIN_VAR const char* g_szUID = "542AST-G3432Q-WE19J-0024";


#ifdef __cplusplus

extern "C" {

#endif


void init(void* pEngine)

{

   g_pEngine = (RenderEngineUI*)pEngine;

}


char* getName()

{

    return (char*)g_szPluginName;

}


char* getUID()

{

    return (char*)g_szUID;

}


void render(vehicle_and_telemetry_info_t* pTelemetryInfo, plugin_settings_info_t* pCurrentSettings, float xPos, float yPos, float fWidth, float fHeight)

{

    if ( NULL == g_pEngine || NULL == pTelemetryInfo )

       return;


    float xCenter = xPos + 0.5*fWidth;

    float yCenter = yPos + 0.5*fHeight;


    g_pEngine->setColors(g_pEngine->getColorOSDInstruments());

    g_pEngine->drawCircle(xCenter, yCenter, fWidth * 0.5);


    char szBuff[64];

    sprintf(szBuff, "%d", pTelemetryInfo->heading);


    u32 fontId = g_pEngine->getFontIdRegular();

    float height_text = g_pEngine->textHeight(fontId);

    float width_text = g_pEngine->textWidth(fontId, szBuff);


    g_pEngine->setColors(g_pEngine->getColorOSDText());

    g_pEngine->drawText(xCenter - 0.5 * width_text, yCenter - 0.5 * height_text, fontId, szBuff);

}


#ifdef __cplusplus

}

#endif
Download the sample source code
Note: The global variables you declare need to have the
PLUGIN_VAR prefix so that they do not interfere with other plugins.
Note2: Remember, the size and position of the plugin on the screen is decided by the user. The user can move it arround or resize it as he needs, so it's important that you draw your plugin only in the assignated rectangle and that your plugin can resize it's drawing to fit the assignated rectangle as best as possible.
Optional functionalities and settings:
A plugin can have additional functions that can be exported and Ruby uses them for additional functionalities such as versioning and having custom plugin settings in the UI, depending on what the plugin needs (See the Ruby AHI built-in plugin for an example in the UI).
The list of optional functions a plugin can export is as follows:
int getVersion();This function should return the version of the plugin. It's used to figure out what version of a plugin the user has.
int getPluginSettingsCount();If your plugin needs custom persistent settings in the UI, that the user should be able to change, then this function should return the number of settings your plugin needs in the UI (they will be changeable by user and persistent)
char* getPluginSettingName(int settingIndex);Should return the setting name, it will show as such in the Ruby menus. Index is from 0 to (settings count - 1)
int getPluginSettingType(int settingIndex);This method should return what type a particular setting is. Currenty supported are bools, integers and enumerations (like: red, blue, green, black) (see the SDK header files for the constants that represent those types).
int getPluginSettingMinValue(int settingIndex);What is the minimum value the user should be able to set for a particular setting. Used only for integer type of settings.
int getPluginSettingMaxValue(int settingIndex);What is the maximum value the user should be able to set for a particular setting. Used only for integer type of settings.
int getPluginSettingDefaultValue(int settingIndex);What should be the default value for a particular setting, after the plugin is installed. The user can of course change the value of a setting from the menus. Boolean settings look for a 0 or 1 as default value and enumeration setting type looks for a value from 0 to enum count-1.
int getPluginSettingOptionsCount(int settingIndex);For a setting that is defined as a enumeration, tells how many options this particular setting should have (i.e. 3 for an enum with 3 options: "apples", "oranges", "cherry").
char* getPluginSettingOptionName(int settingIndex, int optionIndex);Should return the option name for a particular enumeration value in a setting of type enum, it will show in menus as such.
float getDefaultWidth();This is the default width a plugin will have after instalation. The user can move and resize the plugin after instalation. If this function is not implemented by the plugin, Ruby will choose a default width. All sizes are in (0...1) range.
float getDefaultHeight();This is the default height a plugin will have after instalation. The user can move and resize the plugin after instalation. If this function is not implemented by the plugin, Ruby will choose a default height. All sizes are in (0...1) range.
void onNewVehicle(u32 uVehicleId);Called when the controller connect to a vehicle or switches to a different vehicle. Useful if you need to reset some internal data or state.
int requestTelemetryStreams();If your plugin needs access to the telemetry streams that comes from vehicles, you need to add this method and return 1. Ruby then will call the next function below (that must also be implemented by your plugin) each time a telemetry packet is received from vehicles.
void onTelemetryStreamData(u8* pData, int nDataLength, int nTelemetryType);Each time telemetry data comes from a vehicle, this method is called. The telemetry type parameter can be: 1=MAVLink or 2=LTM. Keep in mind that it's up to you to parse the data and figure out the telemetry packets. There are libraries you can use to parse MAVLink or LTM telemetry data. After you parse the data, it's up to you to store what you need and display it on the OSD.
Additional Notes:
You don't need to add settings for the plugin size and position on the screen. This is done automatically by Ruby.
The user can change the plugin settings directly from Ruby menu:
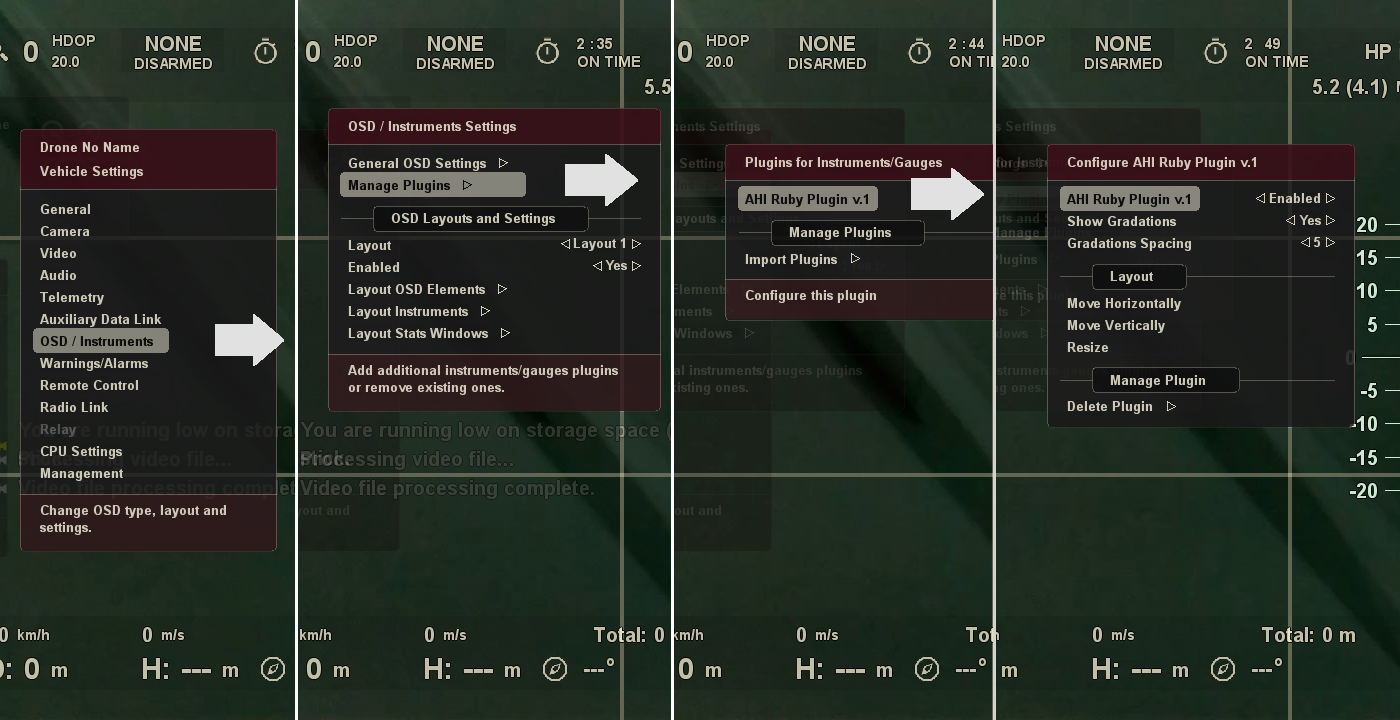
How to change plugin settings